This is the last installment of the three part series on deploying python machine learning code on server-less cloud functions. This installment would focus on AWS Lambda.

Although AWS was one of the pioneers in creating server-less capabilities with their Lambda functions : they haven’t made it any easy. Up until now – GCP Cloud Functions was the easiest. Azure and AWS server-less functions are equally complex to have it up and running.
This blog posting will not be an exhaustive and complete coverage of how to get this done. It just covers a simple and straight forward way to get it done. AWS has other ways – for which you would have to do more research.
As with my earlier blog posts – this one also deals with a standard regression machine learning model for a car price predictor.
The training data is here
The testing data is here
Like before – I would take you through this process in simple steps. But before I get started – I would be assuming that you already have an AWS account.
Step 1 : Create an AWS Lambda function
Sign in as a root user on the AWS login page . Once you come to the home screen type ‘Lambda’ in the search bar and select the Lambda function from below

Next you click on the ‘Create Function’ option. Remember this is region specific. In my case I have chosen Ireland as the region.

I next give the options to create the function. I choose Python 3.6 – although the highest available was 3.8. The reason for this is that I faced some issues with the Numpy version and hence had to go for a lower version of Python. In the Permissions section – don’t change anything. Let it take the default values.

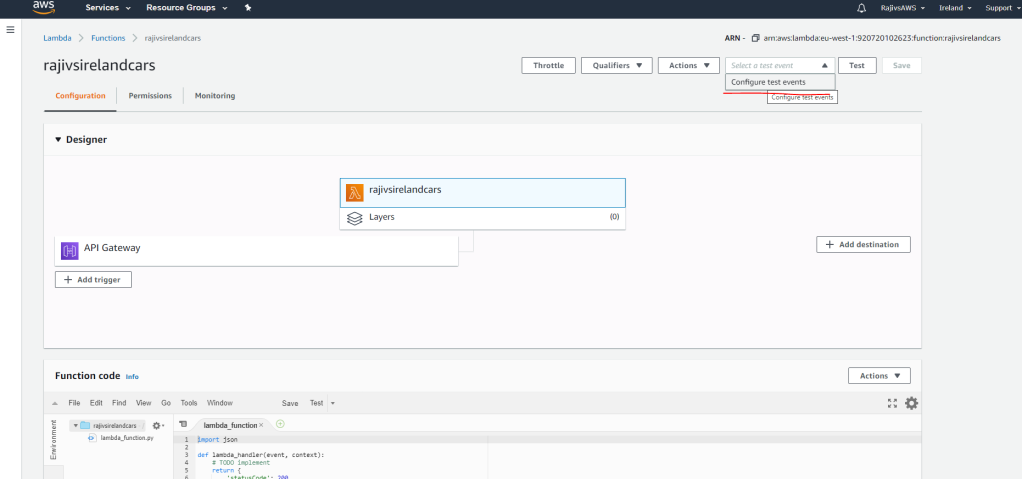
Once you have the Lambda function created – you would need to add a trigger to it : as seen in the next screen

Make sure that the Basic settings of the Lambda function looks like this. In the above screen you need to scroll down to see the screen that is pasted below

Next create a test event by following the screen flow as below
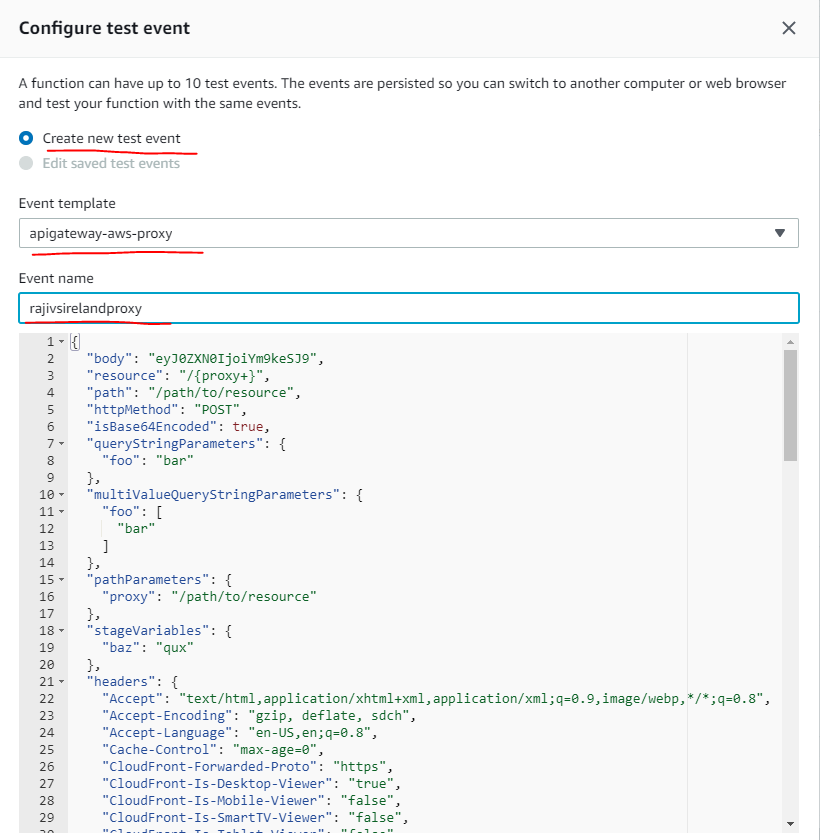
In the above screen – make sure you choose the option apigateway-aws-proxy as the event template. The event name can be given as you choose. In the next screen that follows – provide the event trigger here. In this case a REST API. For this you add a new AWS resource called API Gateway

The next resource that you would add is an S3 storage resource. For this click on th ‘Services’ option in the top left and type ‘S3’ into the search bar – or click S3 down below as shown in the screen here

In the next two screens you would have to create a Bucket and then a folder within the bucket

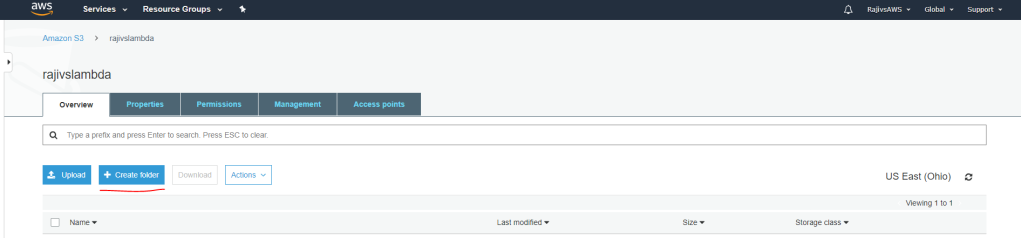
In my case – the name of my bucket is ‘rajivslambda’ and the name of my folder is ‘lambdafiles’
Step 2 : Create the local environment
The first step would be to create an empty folder on your laptop. In my case it is as below

The next step would be to download all the packages one by one. Here in my case I would require numpy, pandas, joblib and sklearn/scikit-learn. What I would do is to manually download the files first
Numpy
Pandas
Scipy/Scikit Learn/Sklearn
https://github.com/scipy/scipy/releases/download/v1.5.2/scipy-1.5.2-cp36-cp36m-manylinux1_x86_64.whl
Once the above files download into your Downloads folder – you would have to extract these using 7z software. Once the folders get extracted – you would have to copy the extracts into your empty folder you had created earlier. In my case – the rajivscarpredictor folder.
Next I would copy my primary code into the same folder. I call my code as lambda_function.py . I also copy the dependent joblib file which is lr_checkpoint.joblib. My lambda_function.py looks like this
import pandas as pd
import json
import joblib
def lambda_handler(event, context):
http_method = event['httpMethod']
if http_method == 'GET':
return {'statusCode': 200,'headers':{'Content-Type':'application/json'},'body': json.dumps('Welcome to Rajivs Car Price Predictor')}
elif http_method == 'POST':
data = pd.DataFrame(json.loads(event['body']))
data2 = pd.get_dummies(data)
model = joblib.load(open('./lr_checkpoint.joblib', 'rb'))
lr_obj = model['model']
modelcolumns_obj = model['modelcolumns']
data2 = data2.reindex(columns=modelcolumns_obj, fill_value=0)
pred1 = lr_obj.predict(data2)
output_text = "Text:" + str(data2) + "\nPredicted Class Is: " + str(pred1)
print(output_text)
return {'statusCode': 200,'headers':{'x-customheader':'Car Price Predictor','Content-Type':'application/json'},'body': json.dumps(output_text)}
After this you do a pip install of pytz, joblib and setuptools packages. This is how you do it – in this context. You go into command prompt and navigate to one folder above rajivscarpredictor folder. You type these two commands there.
pip3 install pytz -t rajivscarpredictor
pip3 install setuptools -t rajivscarpredictor
pip3 install joblib -t rajivscarpredictorThis is how it looks like

While installing the files – you may notice a sub-folder called __pycache__ within your rajivscarpredictor folder. You can delete this.
After all files and folders are added to the main folder – it should look like this

In the above screen – the last two are the main application files. The rest are supporting python packages etc.
Now you zip the entire folder into a zip file and upload it into your S3 folder
Step 3 : Continue AWS setup
Upload the zip file, from your local laptop, to S3 like this

Once uploaded – select the necessary file and pick its URL like this

This the above URL and go back to the Lambda function (via the Services option on the top left of the screen)
Once there you can map your Lambda function to the above S3 zip file like below


You should get this message in the subsequent screen

Next navigate to the API gateway from the Services option on the top left. Choose the API gateway that you would have created earlier. In the next screen that follows – choose the ANY option under the API gateway that you have created. In the screen to the right – click on the Test option as shown below

In the next screen that follows – choose the POST method and past the test data json file (remember the csvjson_car.json file from the earlier two blog posts 🙂 )

Finally click the test button at the bottom of the screen. You should see the below screen appear to your right now

As you can see – its working!!!
Step 4 : Get the End-point URL and test it
Navigate to the API gateway under Services. Choose the API gateway that you have created. Then choose Stages in the left navigation bar. Then choose the default option . You will then see the URL – as shown below

Once you get the URL – you have to suffix it with the name of the lambda function you create like below:
https://c9jlrc41bb.execute-api.us-east-2.amazonaws.com/default/rajivscarpredictor
As before – I would test it on Postman, Curl and on Jupyter Notebook.
POSTMAN

CURL
Navigate to the folder which contains our input json file. In our case its the Downloads folder which contains the csvjson_car.json file. The command you give is this
curl -XPOST https://c9jlrc41bb.execute-api.us-east-2.amazonaws.com/default/rajivscarpredictor -d @csvjson_car.jsonThe output you get is like this below

JUPYTER NOTEBOOK
import requests
import json
#
endpoint2 = "https://c9jlrc41bb.execute-api.us-east-2.amazonaws.com/default/rajivscarpredictor"
headers = {'Content-Type': 'applicaton/json'}
with open("csvjson_car.json", "r") as read_file:
developer = json.load(read_file)
response = requests.post(endpoint2, headers=headers, json=developer)
#
response.contentThe output looks like this

As I said earlier – AWS has various other options to work with Lambda – like AWS SAM and AWS CLI . I haven’t explored AWS Lambda exhaustively. My intent was to have my ML car price predictor model up and running in the simplest possible way.

